 1. Introduction1. Introduction
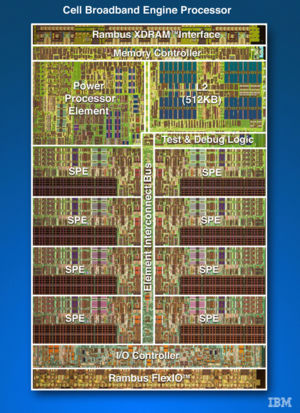
Welcome to the homepage of the Cell BE (CELL Broadband Engine) assignment for the course 5KK70 / Platform-based design. The purpose of this assignment is to get familiar with programming the CELL architecture, which is a highly parallel archicture supporting both task-level and data-level parallelism. This architecture contains one PowerPC RISC and 8 SPEs (Synergistic Processing Element). Both the PowerPC and the SPEs can exploit sub-word parallelism (SIMD). The SPEs have a 128-bit wide data path, which can be divided in e.g. 4 words. All processors are connected by a high-speed multi-ring type of Network-on-Chip. Programming this architecture is extremely challenging, but if you do it right, you can get extreme performance, more than 100 MFlop.
This page contains instructions on how to get started, the description of the assignment and links to pages with information about developing for the Cell BE.
[top]
The development toolkit for the CELL BE is only available for Linux, so you either have to setup a dual-boot system for your PC or use the VM Ware image provided on this site. The easiest way to develop for the Cell BE under Windows is to use VM Ware. The image provided has version 2.1 of the SDK already installed so you can get started straight ahead. Those of you who don't want to use the method described here for some reason can find alternative instructions here.
Download the following two files:
Install VM Ware using the provided installer and unzip the zipfile into a directory. The unzipping can take quite some time so be patient, grab a cup of coffee or something.
Some people seem to have troubles unzipping the file. I don't know exactly what the problem is. If you experience troubles and don't want to download the file over again you could first check its md5 sum using this program: http://etree.org/cgi-bin/counter.cgi/software/md5sum.exe. If it's not ffa7abfc56be1155e09a5b564fa2ebb3 your file is corrupted and there is no other sollution then re-download the file. If the checksum is correct try to extract the file with a different program. I've had good experiences with the latest version of WinRar which can be found here: http://www.rarlabs.com.
Start VM Ware Player from the Start Menu and browse to the directory where you unzipped the zipfile. Open the VM Ware configuration file (fedora-fc6-i386.vmx) and wait for the system to boot.
When asked for a username, type root. The password is inn0vate.
 Eclipse
If you prefer working in an IDE (like Borland C++ Builder or Microsoft Visual Studio) you should install Eclipse as this environment has a plugin for the Cell BE available. Installing Eclipse is very easy. Just go to Applications -> Add/Remove Software. Select Development on the left and check Eclipse. The just hit apply and the software is downloaded and installed for you.
After the installation has finished fire up Eclipse by going to Applications -> Programming -> Eclipse. The default workspace is fine so check the box saying not to ask again and click ok.
To install the plugin for the Cell BE, go to Help -> Software Updates -> Find and Install. Select 'Search for new features to install' and click Next. Click 'New Local Site...'. Go to /opt/ide/com.ibm.celldt.update and click OK. Click OK once more. Click Finish. Check the feature (ide/com.ibm.celldt.update) and click Next. Accept the license agreement. Click Finish. When Eclipse says the plugin is unsigned just say 'Install All'. Answere Yes when you're asked to restart the Eclipse Platform.
[top]
The article found here is mandatory for the exam and gives a lot of information about the Cell BE.
To get started, try out the 'euler' example on your local disc at /opt/ibm/cell-sdk/prototype/src/samples/tutorial/euler. Information about how to do the example can be found in this presentation.
There are a few good article about programming high-performance applications for the Cell BE at IBM's website. You can find them here. You can skip the article about installing Linux on the Playstation 3 as we've already done that for you. Pay special attention to techniques used to speed up your code like branch hints, loop unrolling etc.. This might just give you the advantage to write the fastest program!
On IBM's website you can also find a list with 25 tips to optimal application performance.
There also is an online course about the Cell BE processor here
For more examples, check /opt/ibm/cell-sdk/prototype/src/samples/.
To run the program you'll either need a system with a Cell BE processor (e.g. the Playstation 3) or use a simulator. When debugging your program or trying the examples, the simulater is the easiest option. There are two ways of running your program on the simulator. I'll explain both in short here.
Using the simulator from the command prompt
callthru source /home/root/dir/executable > executableAfter you've done this you have to give the file execute rights by executing the following command:
chmod a+x executable
callthru sink /home/user/dir/dump.bmp < dump.bmp(notice the different direction of < and >)
Using the interface provided by Eclipse
If you've installed the Cell BE plugin for Eclipse you can also let Eclipse do most of the work explained above. Once you've followed the steps to configure everything you only have to hit the green run button to execute your program.
[top]
 4. The assignment
You can choose between the two assignments listed below.
This assignment consists of outputting Mandelbrot fractals to a HD television connected to the Playstation 3. The output should be 1080p=1900x1080 pixels. The user should be able to zoom in and out and navigate through the complex plane using the 6-axis controller. Your assignment will be graded according to performance (frames per second). To achieve a really high grade you can add some features of your own.
To get you going with this assignment I've setup a basic framework. This application doesn't do anything except outputting the contents of outbuff to the screen. It saves you some time finding out how to address the framebuffer and get input from the 6-axis controller.
The next step you should take is give out tasks to the SPE's, let them perform the algorithm and send the results back to the PPE. A straightforward implementation of the Mandelbrot function is already defined in mandelbrot_spe.cpp. Consider the various ways of communication between the SPE and PPE. In this example, all the SPE's run the same program. If you think you can do it better, feel free to alter anything!
For debugging purpose, the define
OUTPUT_SCREEN is commented out. The program now renders the screen ten
times to get a good average of the number of FPS and then outputs the
last rendered screen to a bitmap file named dump.bmp.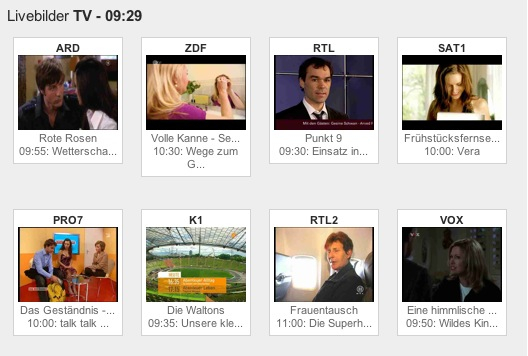
Links
Finished soon!
The purpose of this assignment is to show multiple TV channels on a single high definition screen.
As TV channel we will use a AVI encoded short movie. Each SPE has to run a movie (AVI) decoder, scale the video frame and put the video frames into the frame buffer.
[top]
Here are the instructions to getting everything up and running for those of you who already have Linux installed or prefer not to work with VM Ware. I'm not going to explain how to install a fresh copy of Linux. So if you don't know how to do that, ask a friend or stick with the provided VM Ware image. The instructions below are obtained using Fedora Core 6 but should be roughly the same for any Linux flavour.
First of all you need to download the software development kit (SDK) for the Cell BE. For your convenience we have mirrored version 2.1 here. At IBM’s website you can also find version 3.0 but I don’t have any experience with that. Version 2.1 should be more than enough for this assignment.
After you’ve obtained the SDK, follow the steps in the installation guide. Skip straight ahead to chapter 2 as chapter 1 only contains instructions on how to install Fedora Core 6. You can also skip the step about obtaining the SDK as you’ve just done that.
You don’t have to build the examples as this takes quite some time and you can always build them later on. It’s also not necessary to update the whatis database as described in the installation guide.
I’d recommend that you use Eclipse as your programming environment as it makes life a lot easier. If you do so, also install the Cell plugin for Eclipse as described in the installation guide. If you don’t have Eclipse installed and you’re running Fedora, just type the following as root at the command prompt:
yum install eclipse
This will install Eclipse for you as well as all the required dependencies.
If you have any further questions, don't hesitate to contact me: Kris Hoogendoorn, PT9.15,
[top]