This section provides a getting started guide on the
LCC compiler. For a slightly more detailed discussion on how to use
the LCC compiler see the next section.
Step 1
Open a bash-shell by double-clicking on the bash icon on you
desktop.

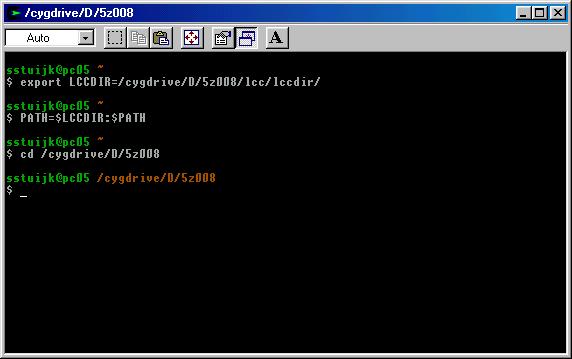
Step 2
Set the LCCDIR variabele in the environment to the directory
containing the LCC executable. Do this using the following command:
export LCCDIR=/cygdrive/D/mmips/lcc/lccdir
Step 3
Add the LCC-directory to you path using the following command:
PATH=$LCCDIR:$PATH
Step 4
Change to the installation directory of the course software (i.e.
<installdir>). This is typically 'd:\mmips\', however within
cygwin we write this different. To revert to this directory, you
should use the following command:
cd /cygdrive/D/mmips
or
cd d:/mmips
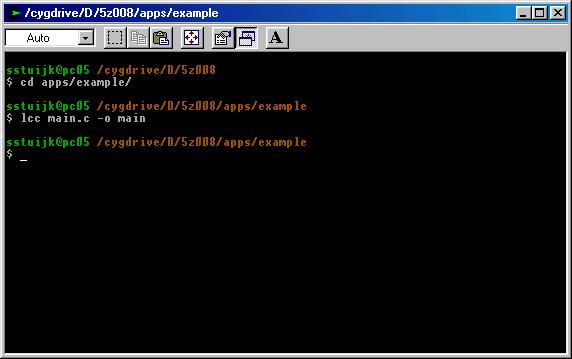
Step 5
Change to the directory in which the source of our test program
'apps/example'.
cd apps/example
The file 'main.c' contains our simple test program. Its
contents is shown below.
void main(void)
{
    int a, b, c, result;

    a = 10;
    b = 3;
    c = 7;

    result = a * b + c;
}
Step 6
We are now ready to compile (and link) the source into an
executable binary for our miniMIPS processor. This can be done with
the following command:
lcc main.c -o main
We now get a binary called 'main' that contains the binary
code of our program.
Step 7
If you want, you can dissamble the binary and look at
the assembler instruction. The can be done with a tool called
'disas'. You use it with the following command:
disas main
The output of the program looks as follows on your screen:
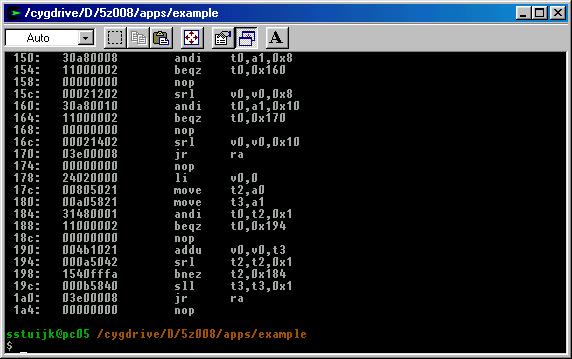
The complete disassembly of the program is shown below. Try to
understand what happens!
main:     file format binary

Disassembly of section .data:

0000000000000000 <.data>:
   0:	00000000 	nop                 # Start of boot-loader
   4:	0c000005 	jal	0x14            # Jump to address 0x14 (Start of program)
   8:	241d2800 	li	sp,10240        # Set stack-pointer
   c:	08000003 	j	0xc             # Jump to your-self (infite loop to terminate program)
  10:	00000000 	nop
  14:	27bdffd8 	addiu	sp,sp,-40   # Put some values on stack
  18:	afbf0010 	sw	ra,16(sp)
  1c:	2418000a 	li	t8,10           # Load 10 into regsiter t8
  20:	afb80024 	sw	t8,36(sp)       # Put register t8 on stack
  24:	24180003 	li	t8,3            # Load 3 into register t8
  28:	afb80020 	sw	t8,32(sp)       # Put register t8 on stack
  2c:	24180007 	li	t8,7            # Load 7 into regsiter t8
  30:	afb8001c 	sw	t8,28(sp)       # Put register t8 on stack
  34:	8fa40024 	lw	a0,36(sp)       # Get value from stack into argument resgiter a0
  38:	8fa50020 	lw	a1,32(sp)       # Get value from stack into argument resgiter a1
  3c:	0c00005e 	jal	0x178           # Call function __mul (multiply function)
  40:	00000000 	nop
  44:	8faf001c 	lw	t7,28(sp)       # Get value from stack into register t7
  48:	00000000 	nop
  4c:	004fc021 	addu	t8,v0,t7    # Add result register v0 and resgiter t7, put result in t8
  50:	afb80018 	sw	t8,24(sp)
  54:	8fbf0010 	lw	ra,16(sp)
  58:	27bd0028 	addiu	sp,sp,40
  5c:	03e00008 	jr	ra              # End of the program, return to boot-loader
  60:	00000000 	nop
  64:	00801021 	move	v0,a0       # A set of un-used shift functions
  68:	30a80001 	andi	t0,a1,0x1
  6c:	11000002 	beqz	t0,0x78
  70:	00000000 	nop
  74:	00021040 	sll	v0,v0,0x1
  78:	30a80002 	andi	t0,a1,0x2
  7c:	11000002 	beqz	t0,0x88
  80:	00000000 	nop
  84:	00021080 	sll	v0,v0,0x2
  88:	30a80004 	andi	t0,a1,0x4
  8c:	11000002 	beqz	t0,0x98
  90:	00000000 	nop
  94:	00021100 	sll	v0,v0,0x4
  98:	30a80008 	andi	t0,a1,0x8
  9c:	11000002 	beqz	t0,0xa8
  a0:	00000000 	nop
  a4:	00021200 	sll	v0,v0,0x8
  a8:	30a80010 	andi	t0,a1,0x10
  ac:	11000002 	beqz	t0,0xb8
  b0:	00000000 	nop
  b4:	00021400 	sll	v0,v0,0x10
  b8:	03e00008 	jr	ra
  bc:	00000000 	nop
  c0:	00801021 	move	v0,a0
  c4:	30a80001 	andi	t0,a1,0x1
  c8:	11000002 	beqz	t0,0xd4
  cc:	00000000 	nop
  d0:	00021043 	sra	v0,v0,0x1
  d4:	30a80002 	andi	t0,a1,0x2
  d8:	11000002 	beqz	t0,0xe4
  dc:	00000000 	nop
  e0:	00021083 	sra	v0,v0,0x2
  e4:	30a80004 	andi	t0,a1,0x4
  e8:	11000002 	beqz	t0,0xf4
  ec:	00000000 	nop
  f0:	00021103 	sra	v0,v0,0x4
  f4:	30a80008 	andi	t0,a1,0x8
  f8:	11000002 	beqz	t0,0x104
  fc:	00000000 	nop
 100:	00021203 	sra	v0,v0,0x8
 104:	30a80010 	andi	t0,a1,0x10
 108:	11000002 	beqz	t0,0x114
 10c:	00000000 	nop
 110:	00021403 	sra	v0,v0,0x10
 114:	03e00008 	jr	ra
 118:	00000000 	nop
 11c:	00801021 	move	v0,a0
 120:	30a80001 	andi	t0,a1,0x1
 124:	11000002 	beqz	t0,0x130
 128:	00000000 	nop
 12c:	00021042 	srl	v0,v0,0x1
 130:	30a80002 	andi	t0,a1,0x2
 134:	11000002 	beqz	t0,0x140
 138:	00000000 	nop
 13c:	00021082 	srl	v0,v0,0x2
 140:	30a80004 	andi	t0,a1,0x4
 144:	11000002 	beqz	t0,0x150
 148:	00000000 	nop
 14c:	00021102 	srl	v0,v0,0x4
 150:	30a80008 	andi	t0,a1,0x8
 154:	11000002 	beqz	t0,0x160
 158:	00000000 	nop
 15c:	00021202 	srl	v0,v0,0x8
 160:	30a80010 	andi	t0,a1,0x10
 164:	11000002 	beqz	t0,0x170
 168:	00000000 	nop
 16c:	00021402 	srl	v0,v0,0x10
 170:	03e00008 	jr	ra
 174:	00000000 	nop
 178:	24020000 	li	v0,0                # __mul (multiply) function
 17c:	00805021 	move	t2,a0
 180:	00a05821 	move	t3,a1
 184:	31480001 	andi	t0,t2,0x1
 188:	11000002 	beqz	t0,0x194
 18c:	00000000 	nop
 190:	004b1021 	addu	v0,v0,t3
 194:	000a5042 	srl	t2,t2,0x1
 198:	1540fffa 	bnez	t2,0x184
 19c:	000b5840 	sll	t3,t3,0x1
 1a0:	03e00008 	jr	ra
 1a4:	00000000 	nop
Step 8
We are now done within the cygwin environment. To simulate the
execution of our binary program on our miniMIPS model, we must load
our binary during the simulation of our SystemC miniMIPS model. To
do this, we replace the existing file 'mips_rom.bin', which can be
found in the directory containing our SystemC model (e.g.
d:\mmips\mips\pipelined_nonsyn\) with our binary (i.e. main).
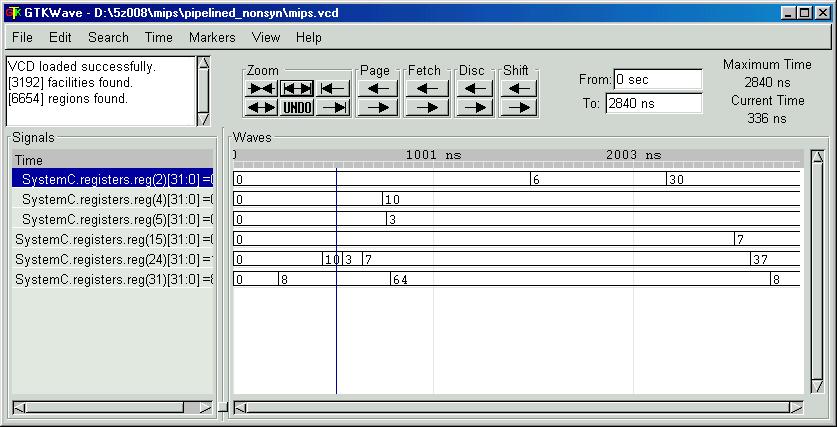
We now start C++Builder and compile and run our SystemC miniMIPS
model. (See for more on this the getting
started guide of assignment 1) As a result we get a file called
mips.vcd. This file conatins a trace of all event that occured
during the simulation. The content of the file can be observed with
the WinWave viewer.
The picture below show the outcome of the simulation of our test
program on our SystemC miniMIPS model.